Text in videos is becoming more and more common these days, particularly for content produced for social media and streaming websites like Facebook and YouTube. Today's video creators frequently use captivating animated text to offer information or to add flair. Text, especially animated text, was typically discouraged in traditional video, but as transmission methods for video and viewer expectations have changed, so too has the use of text. The art and skill of producing videos are using text in inventive ways.
STEP 1: Drag Video to the Timeline
The first thing we need is some video for the text to go on top of. We could just place the text events over an empty track, but everything will look better and make more sense if you place the text over images instead of just a black screen.
✓ If you don’t already have video on your timeline, choose a video clip from the Project Media window and drag it to the timeline area. A new video and audio track combo with the event on them appears.
The text animation will require a new track above the video track, so right-click on the video track or in an empty space in the timeline area and choose Insert Video Track. A new video track appears at the top of the timeline.
STEP 2: Open Media Generators Window
✓ If the Media Generators window isn’t open, go to View>Window>Media Generators. The Media Generators window opens with the Checkerboard generator presets visible.
STEP 3: Click Titles and Text Tab
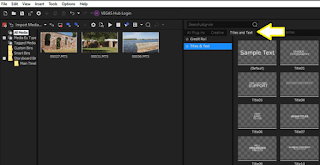
✓ Near the top of the Media Generators window, click the Titles and Text tab. The Titles and Text tab opens with the Credit Roll presets visible.
STEP 4: Click Titles and Text
✓ To get to the new text animations, click Titles and Text in the menu at the left of the Media Generators window.
An array of text preset thumbnails appears, starting with (Default). The next presets are named, consecutively, Title01, Title02, Title03, and so on, to Title25. These are the modern animation presets. After Title25, you’ll find the legacy presets from older versions of VEGAS Pro, but we’ll only look at the first 25 presets.
STEP 5: Drag a Preset to the Timeline
✓ Hover your mouse cursor over a preset thumbnail to watch a preview animation, showing what the preset will do.
✓ Choose one which fits your needs and drag the preset to the empty top track on the timeline.
The Video Media Generators window opens, and the VEGAS Titles & Text controls appear. Replace the default text with your own words.
✓ Click the left edge of the title event to set the timeline cursor to the beginning of the event. Play the timeline to watch the animation in action. If it’s exactly what you wanted, then great! You’ve got a slick new animated text in your project!
You can adjust the length of the event on your timeline, but keep in mind that the event itself has a preset length, so stretching the event too long may cause the animation to loop.
STEP 6: Choose Another Animation
If you decide you’d rather use a different animation instead of the one you chose, you don’t have to drag a new preset to the timeline; you can change the animation in the VEGAS Titles & Text controls.
✓ Click the Generated Media button on the text event to reopen the Video Media Generators window, if necessary.
✓ Click the Animation box. In the drop-down menu, scroll down until you find the Title01 preset. Presets Title02 through Title25 appear below it. You can choose any animation you want, or you can choose each animation one-by-one to see which you prefer.
Choose another preset, then click on the left edge of the text event and play it through from the beginning. Choose different animations and see which one you like best.
Some of the animations work best when you have multiple lines of text. Some work better with different text arrangements, such as two or three words on one line and then one word on the next. Experiment with different animations and word arrangements – you may find exciting combinations that no one else has created before!
Also, you can adjust the anchor point of the animation. The animations are anchored to the center by default, but other anchor points may give you animations you like even better.
✓ Click the Anchor Point box and choose a point from the drop-down menu. Experiment with different choices. See how the animations play out with different anchor points – you may be surprised by the results.
STEP 7: Adjust Your Text
You can also change or adjust all of the usual characteristics of the text In the VEGAS Titles & Text controls. You can change the font. You can change the font color.
Some animations automatically make the text smaller or larger, so you may find it beneficial to adjust the font size. A larger font in an animation which makes the text larger could result in the text falling outside the safe areas or even off the edges of the screen. An animation making the text smaller may make the font harder to read.
✓ Highlight the text you want to change then choose a new font size. Highlight different letters or words and change the font, font size, or font alignment individually.
You can add shadows and outlines and adjust their widths and color.
✓ Adjust the Tracking slider to spread the text letters apart or squeeze them together horizontally. Adjust the Line Spacing slider to move the lines of text further apart or closer together vertically. Be aware, adjusting spacing can affect the anchor point, which will in turn affect the animation.


